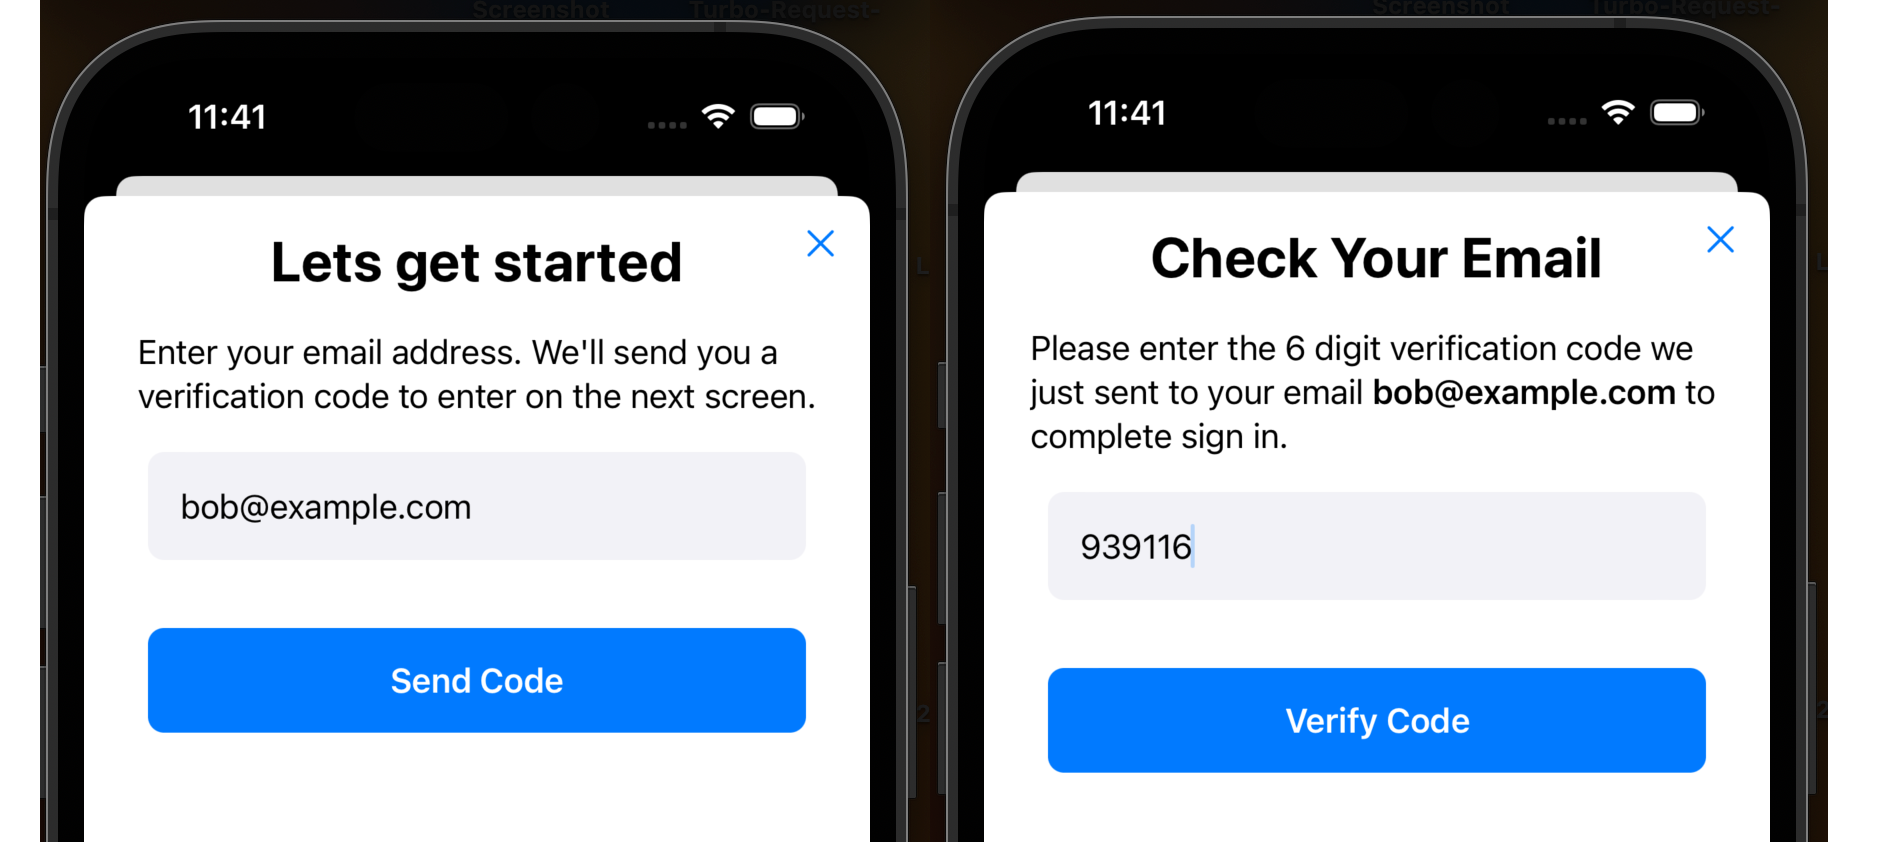
Password-less SwiftUI Native Auth with Turbo iOS
Overview
This post continues on from my last, where we implemented Password-less Authentication in Rails, which powers the backend to the app in this post.
You can get the finished Source Code on GitHub or if you prefer, follow along below from scratch.
What we’ll build
In this article we’ll build a Turbo Native iOS app in Swift
that wraps our Password-less Authentication Rails app from Part 1,
enhancing it with native Swift UI authentication views and persistent local storage of the access_token.

Of course, Turbo Native is fantastic and our web based auth will work just fine out of the box, but if you
plan to make requests to your backend from native swift code outside of a browser context,
you’ll need a way to store the access_token in the native client and include as an HTTP Header with API requests.
For example, I’m working with Apple’s HealthKit in a project
where native authentication is needed so I can identify which user on the backend data POSTed from my API is
intended for when browser cookies are not available.
Turbo Native iOS app
I wrote a short intro to Turbo Native previously so give that a quick read if you need a primer, but in short, it provides the tooling to wrap your Turbo-enabled web app in a native iOS shell.
To get started, there’s a little bit of boiler plate code required, so to speed things along, grab the base template as below, checkout the tag and name your branch.
git clone git@github.com:tapster/passwordless-native-auth.git
cd passwordless-native-auth
git co tags/v1.0.0
git switch -c my-passwordless-native-auth-branch
Now if you open this project in Xcode, build and run it, and as long as your Rails server from the previous post is up and running, you should see our web based Password-less screens running in the simulator! Beautiful!
Native Auth
Due to the magic of Turbo Native, our Rails app works perfectly well already and we can sign in and out!
The challenge is that the access_token associated with our User on the backend is in a web cookie in
our web views. Native code does not run in the browser context, so if we want to make authenticated API
calls to our Rails server, we need to be able to get the access_token on the iOS native side.
We can use the Apple KeyChain to securely store tokens, so what we will do is implement some native Swift UI
screens that POST to the Rails API, and capture the access_token from a JSON response, and store that in the
KeyChain. Any subsequent authenticated API requests we need to make from native code can then just send this
access_token as an HTTP header which we can validate on the server!
Outline
To accomplish this we’re going to create a SwiftUI AuthView with an associated AuthViewModel to handle the events
associated with the views. The ViewModel will call out to an AuthenticationService service class which
encapsulates the main logic of the feature posting out to the Rails server and retr.
View and ViewModel
Let’s start with the UI. Xcode can render a preview of our views, so lets create these. First, create two new “groups”
under App in the file inspector named “Views” and “ViewModels”. Next create a new file named
AuthViewModel.swift in the ViewModels group and copy in the code below:
import Foundation

class AuthViewModel: ObservableObject {

    @Published var state: AuthViewState = .emailInput
    @Published var email: String = ""
    @Published var verificationCode: String = ""

    init(state: AuthViewState = .emailInput) {
        self.state = state
    }

    var isValidEmail: Bool {
        let emailRegex = "[A-Za-z0-9._%+-]+@[A-Za-z0-9.-]+\\.[A-Za-z]{2,}"
        let emailPredicate = NSPredicate(format: "SELF MATCHES %@", emailRegex)
        return emailPredicate.evaluate(with: email)
    }

    var isValidVerificationCode: Bool {
        let verificationCodeRegex = #"^\d{6}$"#
        let predicate = NSPredicate(format: "SELF MATCHES %@", verificationCodeRegex)
        return predicate.evaluate(with: verificationCode)
    }
}
This ViewModel has 3 published properties state, email and verificationCode that our view will populate
and read from. We also have two helpers that validate the text input for email and verification code are in
the right format, and we use these to enable/disable the submit buttons.
Now let’s add the View. Create a new file AuthView.swift in the Views group and copy in the code below:
import Combine
import SwiftUI

enum AuthViewState {
    case emailInput
    case verificationCodeInput
}

struct AuthView: View {
    @ObservedObject var viewModel = AuthViewModel()

    var dismissHandler: (() -> Void)?

    var body: some View {
        ZStack {
            VStack {
                switch viewModel.state {
                case .emailInput:
                    VStack(spacing: 18) {
                        Text("Lets get started")
                            .bold()
                            .font(.title)

                        Text("Enter your email address. We'll send you a verification code to enter on the next screen.")

                        TextField("Email Address",text: $viewModel.email)
                            .textContentType(.emailAddress)
                            .keyboardType(.emailAddress)
                            .autocapitalization(.none)
                            .padding()
                            .background(Color(.systemGray6))
                            .cornerRadius(8.0)
                            .padding([.leading, .trailing])

                        Button(action: {
                            // TODO: post the email
                        }) {
                            HStack {
                                Spacer()
                                Text("Send Code")
                                    .foregroundColor(.white)
                                    .bold()
                                Spacer()
                            }.padding()
                                .background(Color.blue)
                                .cornerRadius(8.0)
                        }
                        .padding()
                        .disabled(!viewModel.isValidEmail)
                        .opacity(viewModel.isValidEmail ? 1.0 : 0.5)

                        Spacer()
                    }
                    .padding()
                case .verificationCodeInput:
                    VStack(spacing: 18) {
                        Text("Check Your Email")
                            .bold()
                            .font(.title)

                        Text("Please enter the 6 digit verification code we just sent to your email __\(viewModel.email)__ to complete sign in.")

                        TextField("Verification code",text: $viewModel.verificationCode)
                            .keyboardType(.numberPad)
                            .padding()
                            .background(Color(.systemGray6))
                            .cornerRadius(8.0)
                            .padding([.leading, .trailing])

                        Button(action: {
                            // TODO: post the verification code
                        }) {
                            HStack {
                                Spacer()
                                Text("Verify Code")
                                    .foregroundColor(.white)
                                    .bold()
                                Spacer()
                            }
                            .padding()
                            .background(Color.blue)
                            .cornerRadius(8.0)
                        }
                        .padding()
                        .disabled(!viewModel.isValidVerificationCode)
                        .opacity(viewModel.isValidVerificationCode ? 1.0 : 0.5)

                        Spacer()
                    }
                    .padding()
                }
            }
            VStack {
                HStack {
                    Spacer()
                    Button(action: {
                        dismissHandler?()
                    }) {
                        Image(systemName: "xmark")
                            .padding()
                    }
                }
                Spacer()
            }
        }
    }
}

struct AuthView_Previews: PreviewProvider {
    static var previews: some View {
        Group {
            Group {
                AuthView(viewModel: AuthViewModel(state: .emailInput))
                    .previewDisplayName("Email Input")

                AuthView(viewModel: AuthViewModel(state: .verificationCodeInput))
                    .previewDisplayName("Verification Code Input")
            }
        }
    }
}
Here we have both views defined in one file, which we switch between based on viewModel.state. Each
VStack should be pretty straightforward to follow, laying out a title, some text, an input and a button to submit.
I used .disabled and .opacity to change the state of the button based on the result of running those
validations isValidEmail and isValidVerificationCode I mentioned in the ViewModel.
Notice we left both Button action blocks empty for now with a TODO comment. We’ll add calls to our
AuthenticationService here a bit later.
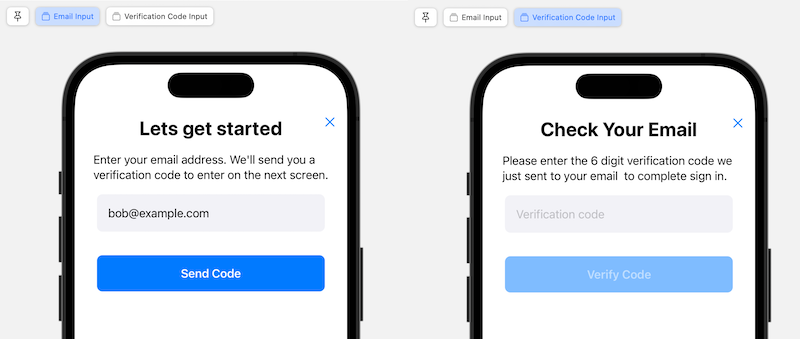
Right! You should be able to see a preview of these screens now in Xcode like this when you view the AuthView.swift
file in the editor:

AuthViewModel and AuthenticationService
Now we need a way to actually POST the email address and validation code the user enters in the SwiftUI
TextFields to the Rails backend and handle the responses. We’ll call each of these when we tap the
respective button, and we’ll do this using a Service class.
We’ll call this AuthenticationService from the Button action in the SwiftUI AuthView via our
ViewModel AuthViewModel. We do this because the ViewModel manages the state of our views and acts as
an intermediary between the UI the user actually sees and touches, and the service that communicates
with our backend server.
First lets update our ViewModel so open up the file App/ViewModels/AuthViewModel.swift and replace the contents
with the following code:
import Foundation

class AuthViewModel: ObservableObject {
    private let authService = AuthenticationService()
    var onAccessTokenReceived: (() -> Void)?

    @Published var state: AuthViewState = .emailInput
    @Published var email: String = ""
    @Published var verificationCode: String = ""

    init(state: AuthViewState = .emailInput) {
        self.state = state
    }

    func postEmail() {
        authService.postEmail(email: email) { _ in
            self.state = .verificationCodeInput
        }
    }

    func postVerificationCode() {
        authService.postVerificationCode(email: email, verificationCode: verificationCode) { newToken in
            if let newToken = newToken {
                print("Received new token: \(newToken)")
                self.onAccessTokenReceived?()
            } else {
                print("Failed to retrieve new token.")
            }
        }
    }

    var isValidEmail: Bool {
        let emailRegex = "[A-Za-z0-9._%+-]+@[A-Za-z0-9.-]+\\.[A-Za-z]{2,}"
        let emailPredicate = NSPredicate(format: "SELF MATCHES %@", emailRegex)
        return emailPredicate.evaluate(with: email)
    }

    var isValidVerificationCode: Bool {
        let verificationCodeRegex = #"^\d{6}$"#
        let predicate = NSPredicate(format: "SELF MATCHES %@", verificationCodeRegex)
        return predicate.evaluate(with: verificationCode)
    }
}
Here we’ve added two functions postEmail() and postVerificationCode() that are called from the AuthView when
the user taps the button. These two functions then call our AuthenticationService, setting the state in the
ViewModel based on the responses.
AuthenticationService
We’re going to be storing the access_token that we get back from the server in the iOS Keychain, and while we can work
with the Keychain directly, we can greatly simplify our code by leveraging the KeychainAccess package, so lets add that
as a dependency.
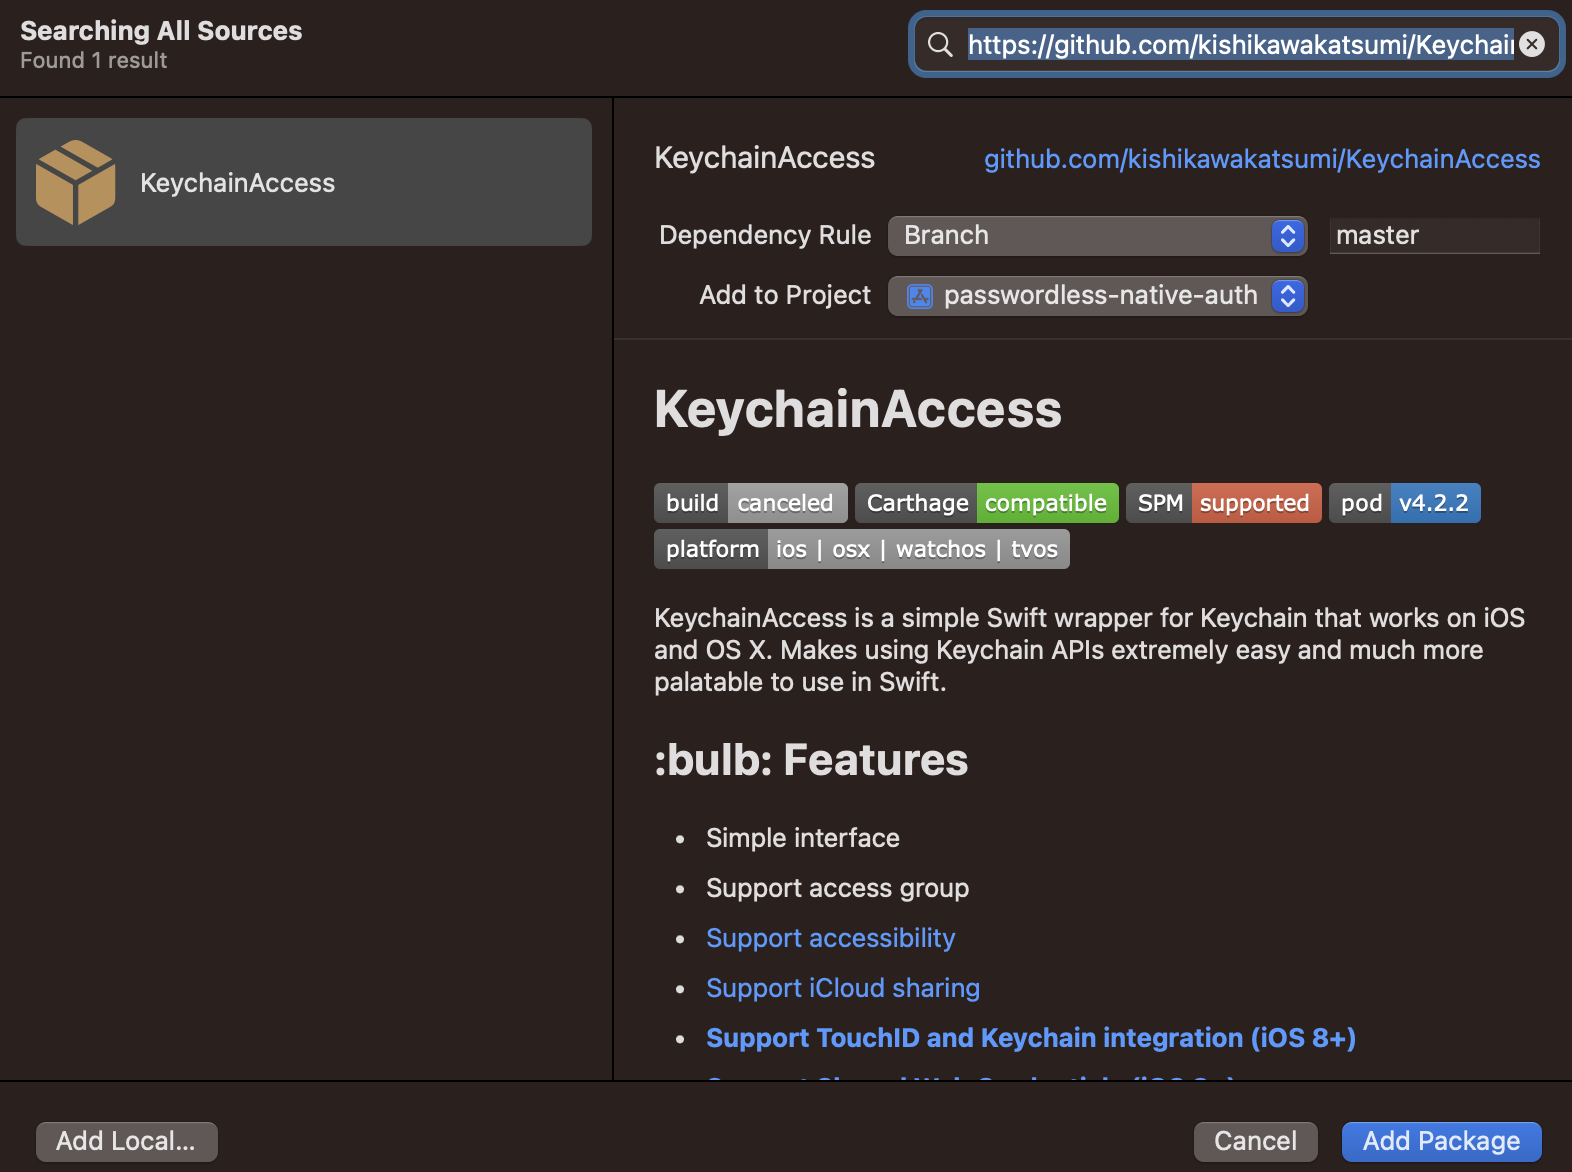
Go to the File menu and select “Add Packages…”. This will bring up the Apple Swift Packages modal shown below, where
we need to paste in the GitHub location of the KeychainAccess package, so paste in
https://github.com/kishikawakatsumi/KeychainAccess and click “Add Package”

Now create another new group in the file navigator named Services and create a new file within it for our
AuthenticationService named AuthenticationService.swift and copy in the following code:
import Foundation
import KeychainAccess
import WebKit

class AuthenticationService {
    private let baseURL = URL(string: "http://localhost:3000")!

    func postEmail(email: String, completion: @escaping (_ token: String?) -> Void) {
        let url = baseURL.appendingPathComponent("auth.json")

        var request = URLRequest(url: url)
        request.httpMethod = "POST"
        request.addValue("application/json", forHTTPHeaderField: "Content-Type")

        let json: [String: Any] = ["email": email]
        let jsonData = try? JSONSerialization.data(withJSONObject: json)

        request.httpBody = jsonData

        let task = URLSession.shared.dataTask(with: request) { data, response, error in
            if let error = error {
                print("An error occurred: \(error)")
                return
            }

            if let httpResponse = response as? HTTPURLResponse,
               httpResponse.statusCode == 200,
               let json = try? JSONSerialization.jsonObject(with: data ?? Data(), options: []) as? [String: Any],
               let msg = json["msg"] as? String {
                DispatchQueue.main.async {
                    completion(msg)
                }
            } else {
                DispatchQueue.main.async {
                    completion(nil)
                }
            }
        }

        task.resume()
    }

    func postVerificationCode(email: String, verificationCode: String, completion: @escaping (_ accessToken: String?) -> Void) {
        let url = baseURL.appendingPathComponent("auth_verification.json")

        var request = URLRequest(url: url)
        request.httpMethod = "POST"
        request.addValue("application/json", forHTTPHeaderField: "Content-Type")

        let json: [String: Any] = ["email": email, "verification_code": verificationCode]
        let jsonData = try? JSONSerialization.data(withJSONObject: json)

        request.httpBody = jsonData

        let task = URLSession.shared.dataTask(with: request) { data, response, error in
            if let error = error {
                print("An error occurred: \(error)")
                return
            }

            if let httpResponse = response as? HTTPURLResponse,
               httpResponse.statusCode == 200,
               let json = try? JSONSerialization.jsonObject(with: data ?? Data(), options: []) as? [String: Any],
               let newToken = json["token"] as? String {
                let headers = httpResponse.allHeaderFields as? [String: String]

                do {
                    let keychain = Keychain(service: "your-app-name-here")
                    try keychain.set(newToken, key: "AuthToken")
                } catch {
                    print("Keychain storage or cookies error: \(error)")
                }

                DispatchQueue.main.async {
                    completion(newToken)
                }
            } else {
                DispatchQueue.main.async {
                    completion(nil)
                }
            }
        }

        task.resume()
    }
}
Our AuthenticationService has two functions postEmail and postVerificationCode which we’re going to call from the
AuthViewModel as explained previously.
These two functions are very similar in that they set the endpoint URL, set some HTTP headers, wrap up the data as JSON
and then POST to the Rails backend API. postEmail as the name suggests results in the email the user entered in the
TextField of the view being posted to the server, and the Rails controller responding by sending a 6-digit verification code
to that email address, and postVerificationCode sends the verification code the user entered into the subsequent TextField
to our Rails app, which validates the code entered matches the code that was generated and emailed to the user, and then
stores the access_token it receives back from the server in the Keychain.
This access_token can then be set as an HTTP header in any future API requests from iOS that need authentication - similarly
to how the Cookie works for web requests, and our backend can use this token to find the right user!
Wire up the AuthView buttons
The last part of connecting the Views to the ViewModel and AuthenticationService is to wire up the buttons to call the ViewModel
functions we added above. Lets do that now. Open up the App/Views/AuthView.swift file and replace the “TODO” comments with
function calls in the two Button actions as follows:
    // TODO: post the email
    viewModel.postEmail()
and
    // TODO: post the verification code
    viewModel.postVerificationCode()
PathConfiguration
If you build run the app in the simulator now, you’ll see the webapp as before. All very cool, but how can we get our new native auth screens to be rendered when the user clicks “Sign In” instead of the web form?
This is where we leverage some more Turbo Native magic, namely PathConfiguration.
This allows us to map specific paths in our Rails app to properties that the iOS app can then access before a page is loaded
and do something. In our case we’re going to map the "/auth" path to load a native ViewController modally, in place of the default web view.
As mentioned in the docs, the PathConfiguration configuration file can be local to the app or served from the Rails server. Managing this on the server is incredibly powerful since it means we can change native parts of our iOS app remotely! For example, we could define the tabs, turn features on and off, update colors or similar. For the purpose of this demo we’ll just use a local file but wanted to mention this.
Create a new file PathConfiguration.json in the Configuration group and copy in the following code:
{
  "settings": {},
  "rules": [
    {
      "patterns": ["/auth"],
      "properties": {
        "controller": "authentication",
        "presentation": "modal"
      }
    }
  ]
}
Now open up the App/Delegates/SceneDelegate.swift file and replace the private lazy var session declaration with the
following code that links this PathConfiguration we just created to the session:
private lazy var session: Session = {
    let configuration = WKWebViewConfiguration()
    configuration.applicationNameForUserAgent = "Turbo Native iOS"

    let session = Session(webViewConfiguration: configuration)
    session.delegate = self
    session.pathConfiguration = PathConfiguration(sources: [
        .file(Bundle.main.url(forResource: "PathConfiguration", withExtension: "json")!),
    ])
    return session
}()
Now we can check if a request matches the rule we defined in PathConfiguration and if it does, intercept the
default behaviour where the VisitableViewController is pushed onto the navigation stack, and instead, present our
native SwiftUI view modally.
Open up App/Delegates/SceneDelegate.swift again and add the following function right after the existing
private func visit() function. We’ll be calling this to create a UIHostingController which is the way we
can render SwiftUI views with UIKit:
private func createAuthenticationViewController() -> UIViewController {
    let authViewModel = AuthViewModel()
    var authView = AuthView(viewModel: authViewModel)
    return UIHostingController(rootView: authView)
}
Xcode should complain now saying something like “Cannot find ‘UIHostingController’ in scope” and kindly suggest the
fix is to add import SwiftUI, so go ahead and add that import at the top of the file.
Also in the SceneDelegate file replace the existing didProposeVisit session function with the following code:
func session(_ session: Turbo.Session, didProposeVisit proposal: Turbo.VisitProposal) {
    if proposal.properties["controller"] as? String == "authentication" {
        navigationController.present(createAuthenticationViewController(), animated: true)
    } else {
        let controller = VisitableViewController(url: proposal.url)
        session.visit(controller, options: proposal.options)

        navigationController.pushViewController(controller, animated: true)
    }
}
This function is called whenever a link is clicked in our WebView and we can inspect the VisitProposal to see if it
was the /auth path. If it was the auth path, rather than create a VisitableViewController from the URL and push it onto the
navigation stack as is the default behaviour, we present our AuthView by calling the createAuthenticationViewController()
function.
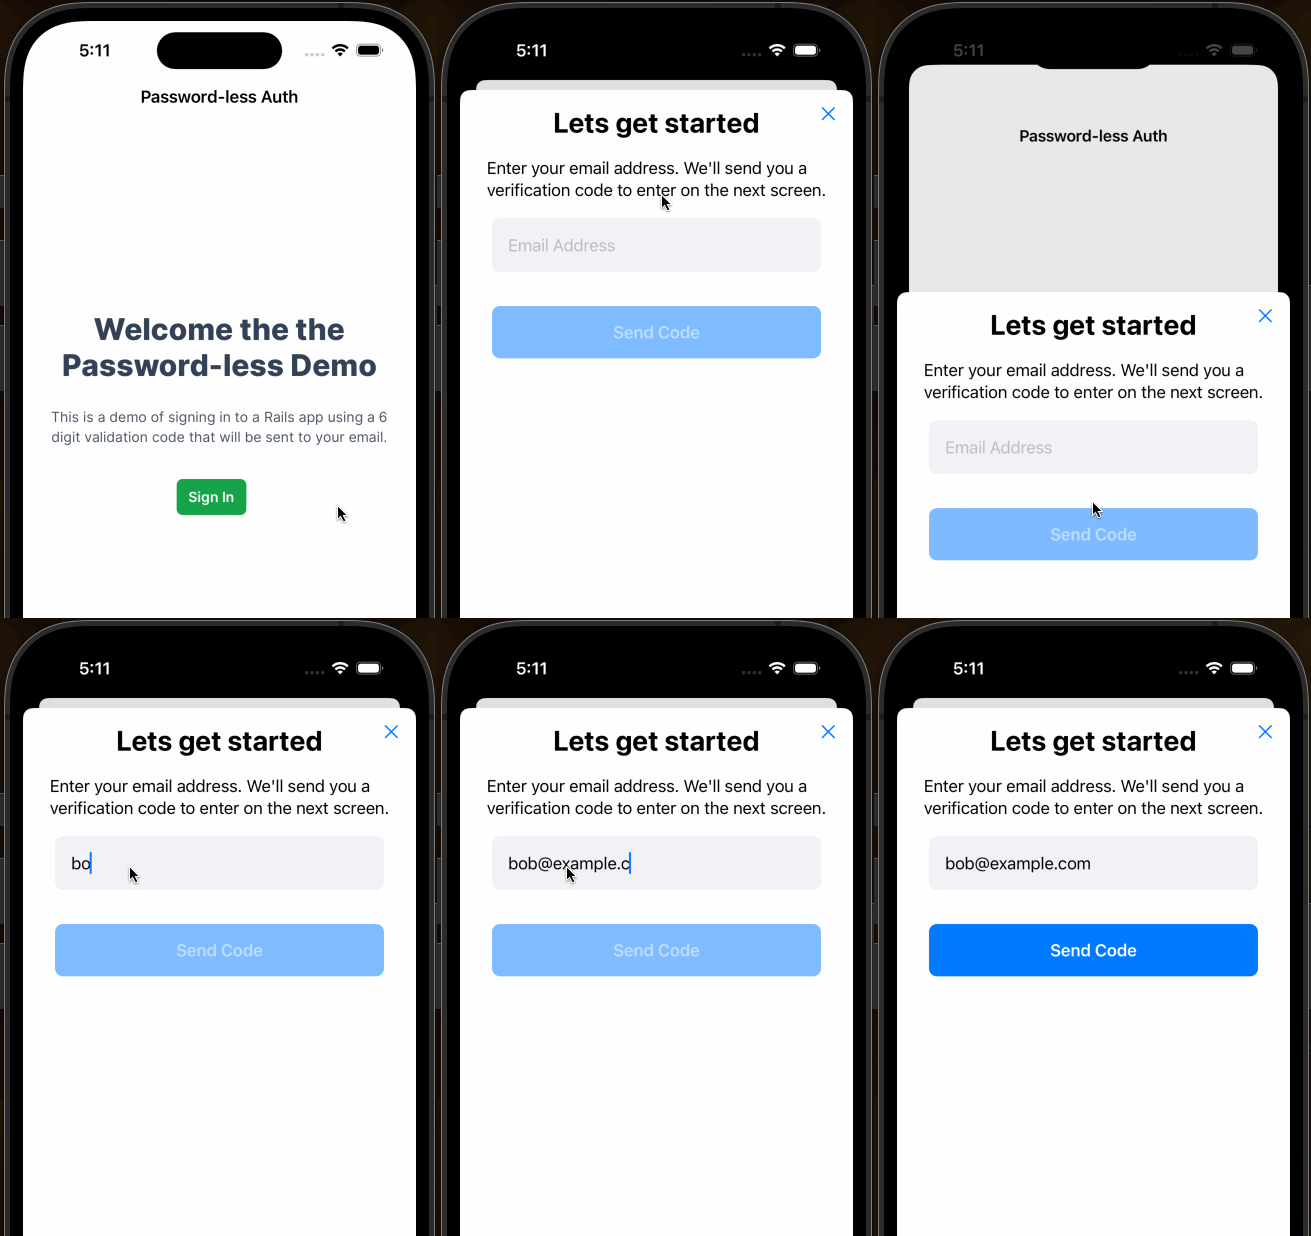
OK! Now if you build and run the app in the simulator you should see our shiny new SwiftUI AuthView pop up as
a modal as shown here. Notice too, this gif also shows the isValidEmail function in action as it enables the “Send Code”
button only after a valid email is completely entered.

X marks the spot
You may have noticed an ‘x’ in the top right of the AuthView screens. This should dismiss the modal when tapped. You can
already swipe the view down to close it but the ‘x’ is a nice touch that users expect. We already have a closure defined
in the View with var dismissHandler: (() -> Void)? and this is called when the ‘x’ is tapped.
To make the modal close, we need to implement the callback in the SceneDelegate where the AuthView is instantiated.
Open up the App/Delegates/SceneDelegate.swift file and replace the createAuthenticationViewController() function with
the following implementation:
private func createAuthenticationViewController() -> UIViewController {
    let authViewModel = AuthViewModel()
    var authView = AuthView(viewModel: authViewModel)

    authView.dismissHandler = {
        self.window?.rootViewController?.dismiss(animated: true, completion: nil)
    }

    return UIHostingController(rootView: authView)
}
Now when we build and run the app, when you tap the ‘x’ in the AuthView modal, it will be dismissed. Great!
Wrapping up
OK! We’re almost there! We still need to implement closing the modal after the user has entered a valid code, and reloading the webview underneath so it shows the new “logged in” state.
In a similar way as the dismissHandler above, we already have a var onAccessTokenReceived: (() -> Void)? closure declared in
our AuthViewModel and we’re calling this when we receive the access_token back from the Rails API in the ViewModel
with self.onAccessTokenReceived?(). All that remains is to add the implementation in the SceneDelegate.
Open up the App/Delegates/SceneDelegate.swift file again, and replace the createAuthenticationViewController() function
with the following code:
private func createAuthenticationViewController() -> UIViewController {
    let authViewModel = AuthViewModel()
    var authView = AuthView(viewModel: authViewModel)

    authViewModel.onAccessTokenReceived = {
        DispatchQueue.main.async {
            self.window?.rootViewController?.dismiss(animated: true, completion: nil)
            self.visit()
        }
    }

    authView.dismissHandler = {
        self.window?.rootViewController?.dismiss(animated: true, completion: nil)
    }

    return UIHostingController(rootView: authView)
}
One last gotcha
If you build a run the app now, it all looks good right? Well, almost. The final gotcha is that although we’ve
authenticated the user with the native SwiftUI screens calling the Rails API, and we’ve stored our access_token
on the iOS device in the Keychain, the web views in our turbo native app have no idea about this. So while native
code can add the access_token in an HTTP header for authentication server side, any web view interactions will
still appear to be logged out! Thats not good.
To fix this we need to manually set the Cookie in our apps WebView. Fortunately for us, when we POST to the /auth_verification.json
endpoint in our Rails app from the iOS AuthenticationService, the cookie is being set in the Rails controller and will be returned
in the HTTP Headers. All we need to do in our iOS app is grab the cookies from the response at the same time as we’re getting the
access_token from the JSON, and manually set them in our web session.
Open up the AuthenticationService file App/Services/AuthenticationService.swift and just below the line
try keychain.set(newToken, key: "AuthToken") where we set the token in the Keychain, and within the do.. catch block, paste in
the following code which iterates over the cookie headers in the HTTP response and sets them in the WKWebsiteDataStore:
DispatchQueue.main.async {
    let cookies = HTTPCookie.cookies(withResponseHeaderFields: headers!, for: self.baseURL)
    HTTPCookieStorage.shared.setCookies(cookies, for: self.baseURL, mainDocumentURL: nil)
    let cookieStore = WKWebsiteDataStore.default().httpCookieStore
    cookies.forEach { cookie in
        cookieStore.setCookie(cookie, completionHandler: nil)
    }
}
That’s it! Now you should be able to sign in using the native auth SwiftUI views, and see the reloaded web page in a logged in state!
Next steps
Well! That was a lot of code and lot to read, but armed with this, along with the Rails backend code I wrote about last week you should be well on your way to adding password-less auth to your turbo native iOS app!
If you got this far, as an exercise for the reader, you might want to add in more robust error handling, perhaps refactor
out some of the duplication around POSTing to the server in the AuthenticationService, make sure the token is deleted
from the Keychain when a user logs out (currently just the cookie is deleted server side), or any other ideas you may have.
PRs welcome!
As always get in touch and drop me a note with feedback or questions.