Alexa Custom OAuth Account Linking with Rails
Custom skills with Amazon Echo devices provide a great way for users to interact with your product or service by voice. This is something particularly true at Cookpad where users are cooking, so their hands are often busy or messy with ingredients. Voice provides an excellent way to interact with a recipe while cooking.
Conversely, searching by voice is really not a great experience. We’re all used to searching websites and perusing lists of results, quickly drilling down to something we want to cook. Try to do the same thing by voice and get the results as audio responses becomes laborious and even frustrating.
Ecosystem
An ideal scenario then would be to search, bookmark or even post our own recipes using the Cookpad app or website, but then being able to instantly access these recipes we already decided are of interest by voice on Alexa.
Enter account linking…
Account Linking Overview
Amazon provides a way to authenticate user accounts between third party services and Alexa using the industry standard OAuth strategy. What this means is as a Cookpad user you can log in to Cookpad and then an Authentication Token is generated that Amazon stores in your Alexa user account. Then when Alexa makes API calls to Cookpad for recipes, this token is sent along with the request, so Cookpad knows what user is interacting and can securely retrieve that user’s bookmarks and their own recipes they may have shared.
The simplest way to handle OAuth is to use Amazon’s own “Log in with Amazon” or LWA, but since it’s not widely used by third party services like Cookpad as a way for their users to sign in, often a Custom OAuth solution is required.
Custom OAuth
The basic interaction flow for a user that has not yet linked accounts is as follows:
- User tries to access a feature that requires authentication
- Alexa notifies them they need to link their account and sends a push notification to the Alexa mobile app
- On clicking the link in the Alexa app the user is redirect to a Cookpad login page on their phone.
- After successfully signing in to Cookpad the accounts are now linked, and accessing the feature from #1 above on Alexa should now work using the Cookpad user’s account.
Rails OAuth Provider with Doorkeeper
Since Cookpad’s platform is built with the Rails framework, we’re fortunate to be able to leverage the extremely robust Doorkeeper OAuth gem. To add Doorkeeper to your existing app that has user accounts and sign in, and you want to add Alexa Account Linking, read on!
1. Add the Doorkeeper Gem and create the database tables
Firstly we add the Doorkeeper gem to our app, run the install script and then generate migrations and migrate the database:
bundle add doorkeeper

rails generate doorkeeper:install

rails generate doorkeeper:migration
In addition to the gem, and the database migrations, the install script will have generated an initializer at
config/initializers/doorkeeper.rb, an english language locale file config/locales/doorkeeper.en.yml
as well as adding a use_doorkeeper macro to out routes file.
2. Define the Foreign Keys from the Doorkeeper tables and our User
Just before we run the migrations we need to uncomment the lines in the generated migration file to
add the Foreign Keys to our existing User table. Find the new migration file and uncomment these lines
at the end. For me this file is db/migrate/20221001202613_create_doorkeeper_tables.rb:
    # Uncomment below to ensure a valid reference to the resource owner's table
    add_foreign_key :oauth_access_grants, :users, column: :resource_owner_id
    add_foreign_key :oauth_access_tokens, :users, column: :resource_owner_id
Then we can migrate the database with:
rails db:migrate
3. Connect the Doorkeeper Token tables with our User model
The existing User in our app that we will be wiring up to Amazon via Account Linking will need
the associations to the new doorkeeper_access_grants and doorkeeper_access_tokens. Lets add them
to our user app/models/user.rb as follows:
class User < ApplicationRecord

   (... existing code omitted ...)

   has_many :doorkeeper_access_grants,
      class_name: "Doorkeeper::AccessGrant",
      foreign_key: :resource_owner_id,
      inverse_of: false,
      dependent: :delete_all

   has_many :doorkeeper_access_tokens,
      class_name: "Doorkeeper::AccessToken",
      foreign_key: :resource_owner_id,
      inverse_of: false,
      dependent: :delete_all

   (... existing code omitted ...)
end
4. Add the Authentication Logic to the Doorkeeper Initializer
Now, in the initializer generated by the install at config/initializers/doorkeeper.rb we need to
add code that will check if our user is authenticated or not in the resource_owner_authenticator
block. Doorkeeper will defer to this check any time an authenticated resource is requested.
Something like below gives you the idea, just replace this with something that will retrieve the current
User or redirect to the login page in your app. For example in our case, we leverage Current.user so
can use that in place of User.find_by below.
resource_owner_authenticator do
   User.find_by(id: session[:user_id]) || redirect_to(new_user_session_url)
end
Doorkeeper provides a web interface for creating and managing OAuth “Applications”. In our case we’ll be creating
one specifically for Alexa to authenticate. You’ll need to add the admin_authenticator block in
config/initializers/doorkeeper.rb and restrict access to administrators. It should return true for an admin
or otherwise false in which case it will return a 403 Forbidden response.
Use whatever implementation you like to ensure the current logged in user is an admin, eg in my case I can use
Current.user.admin?, or at the most basic level something like this:
  admin_authenticator do
    User.find_by(id: session[:user_id]).admin?
  end
Lastly while we’re in there editing the initializer, lets also define the access token scopes we want to support in our service.
default_scopes :read, :write
Testing the Basic Doorkeeper Functionality
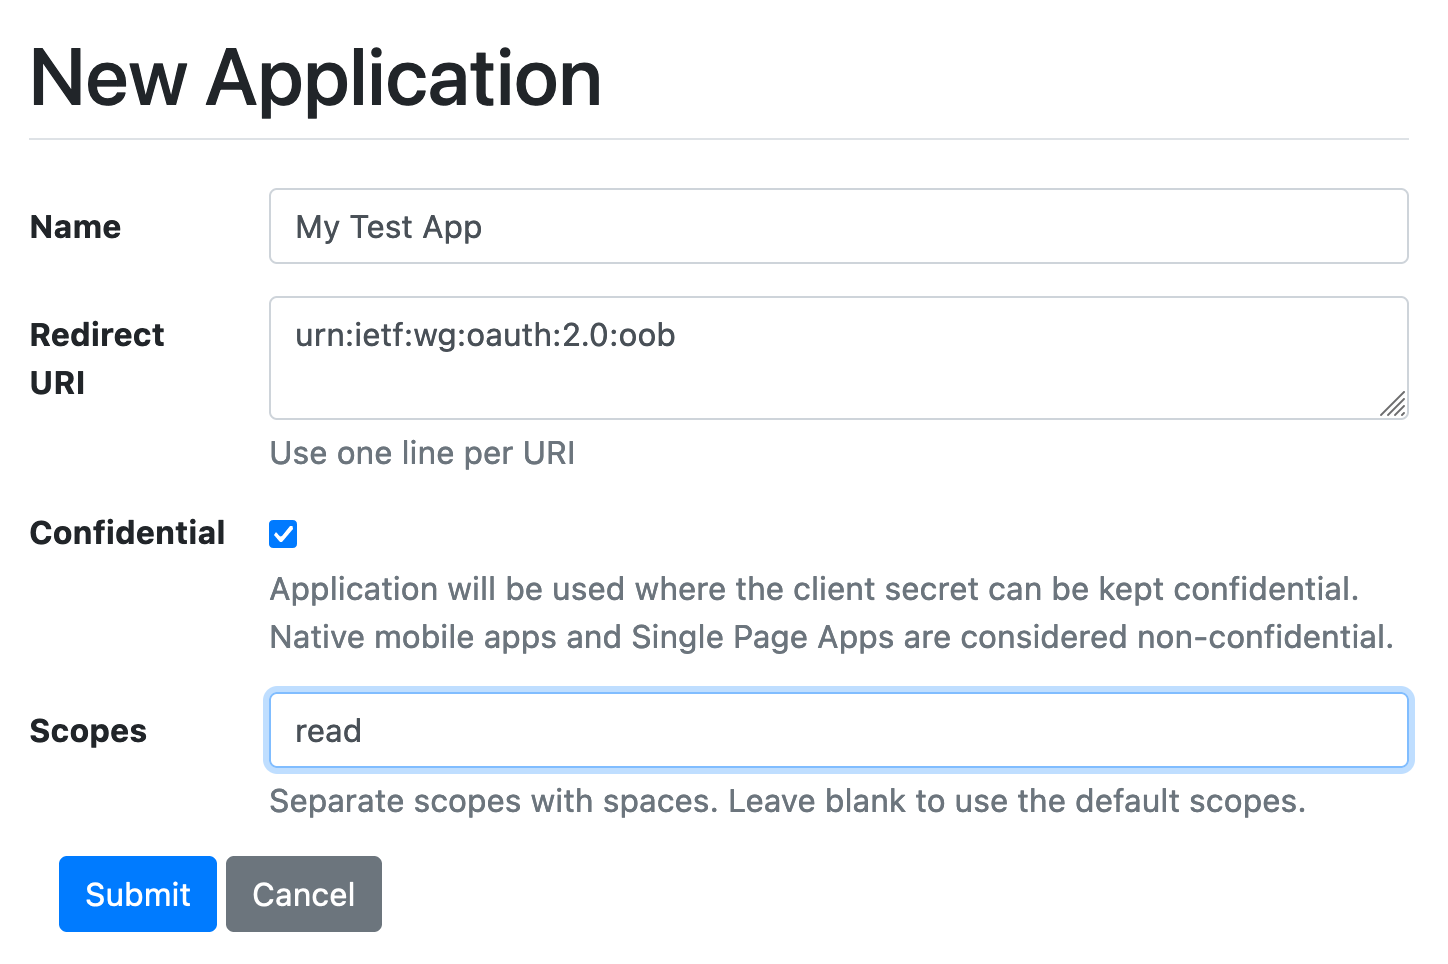
Now we’ve introduced Doorkeeper, we can test the basic functionality by creating an new OAuth Application via
the web interface by visiting http://localhost:3000/oauth/applications/new
and adding the config as shown below. Note, you’ll need to be logged in as an admin - or however you defined an admin
above in the admin_authenticator block of the doorkeeper initializer.

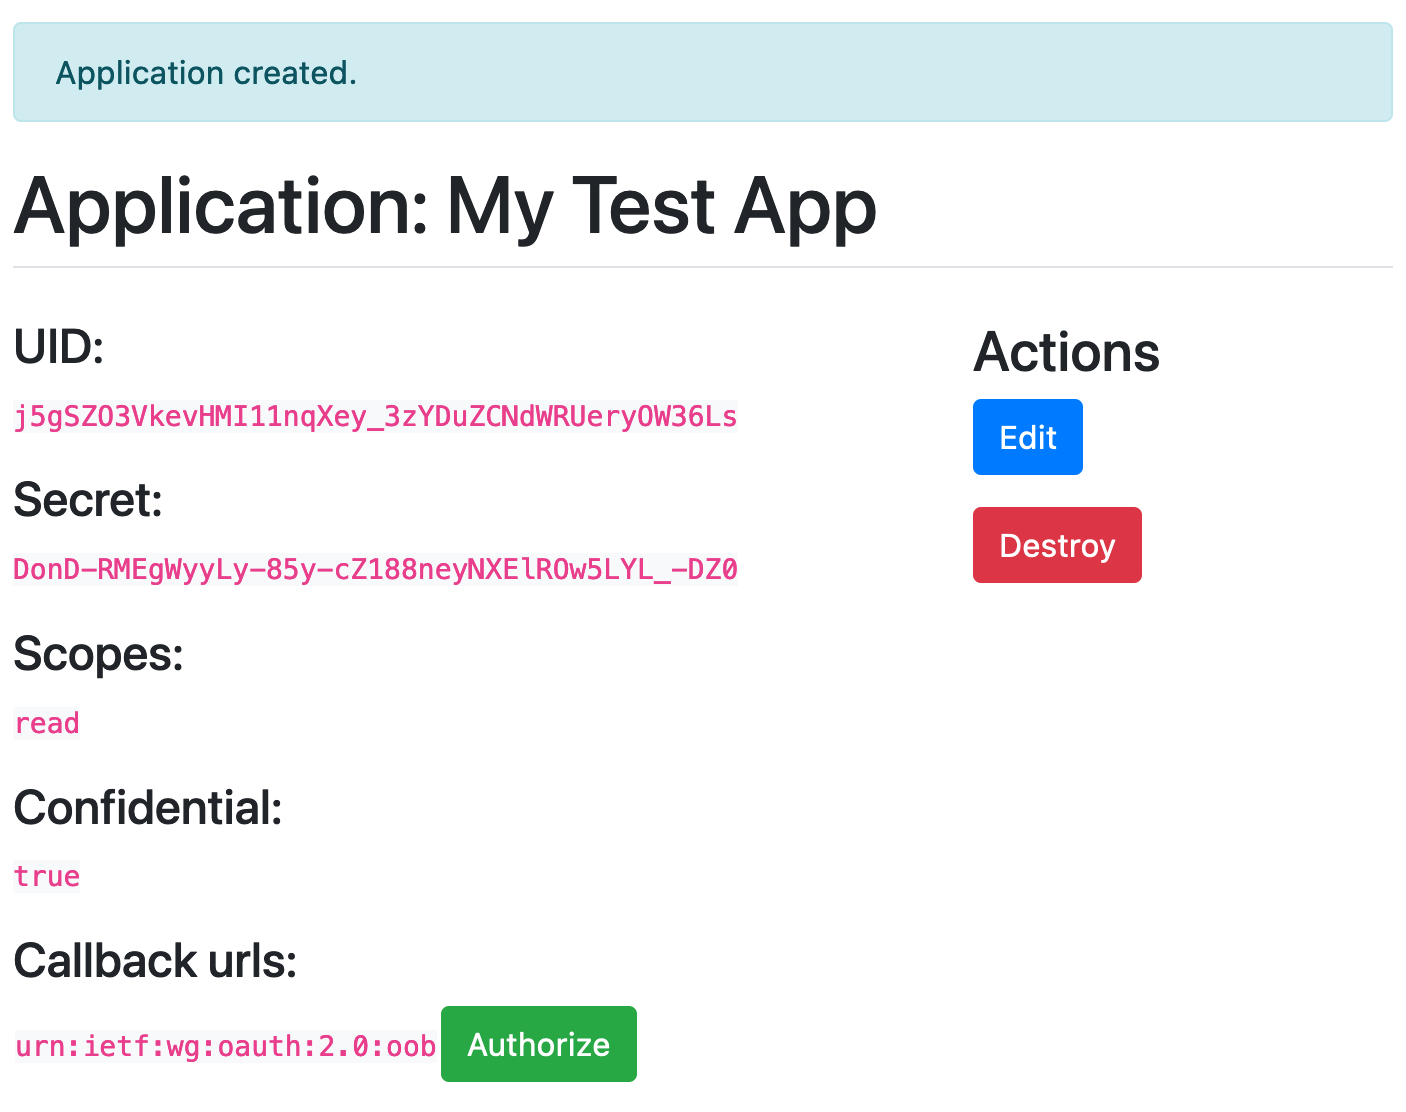
Notice the redirect_uri is set to urn:ietf:wg:oauth:2.0:oob which is a special “pass through” value we can use for testing. When
you submit this form, your OAuth Application should be created, including client ID and token being generated and you will
see this in your browser:

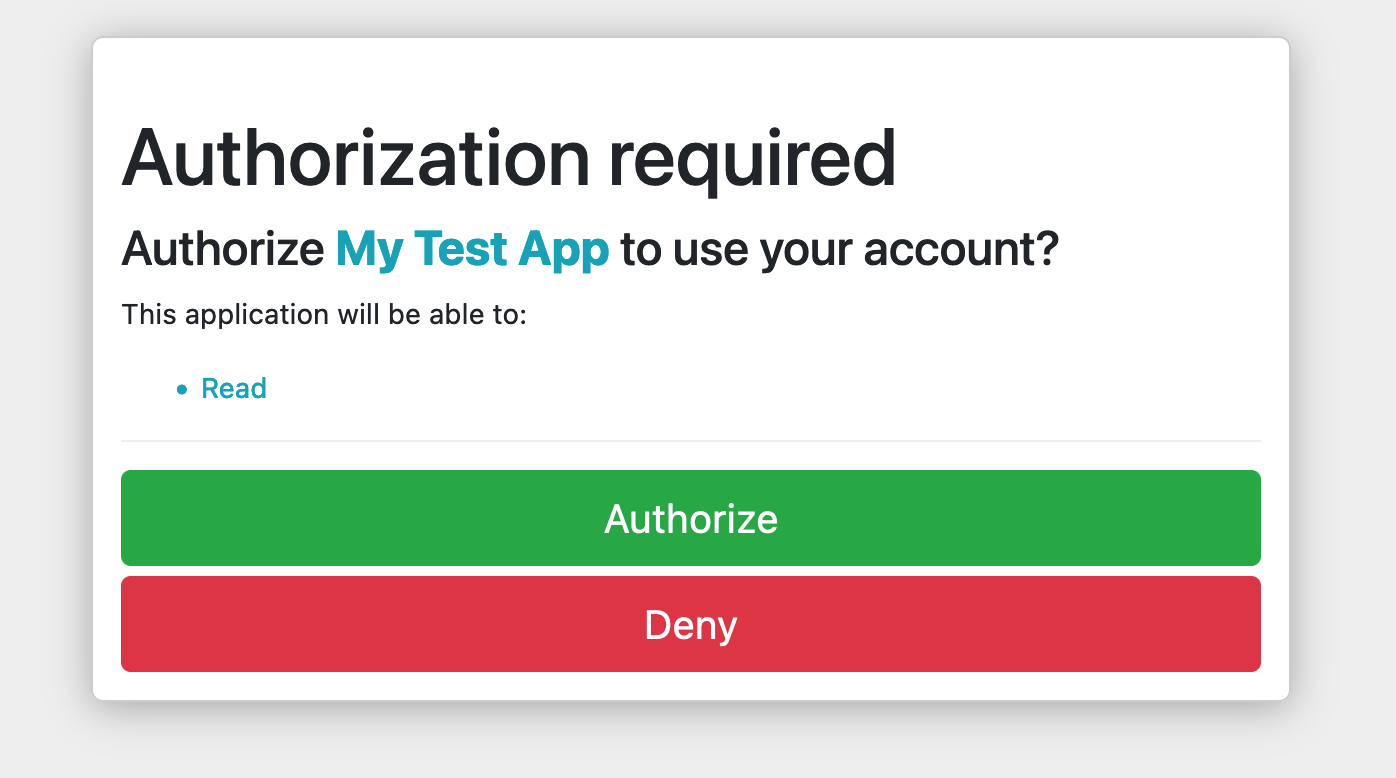
Now, when you click the “Authorize” button, you’ll get the Authorize/Deny screen. This is exactly the screen users will see after they click through from Amazon and try to “Link Accounts”

Then after you click “Authorize”, you’ll see a test page that simply renders out the Authorization Code that Doorkeeper has generated for this user:

This Authorization Code is what the client then needs to use to get a “real” Access Token. It may seem convoluted but this back and forth is what makes the OAuth flow secure and reliable.
So, now we have our Authorization Code - in my case here zKcGfdtsU-s3m5S2iBeE0-HwFx-sLcRkw5stvcYWNDO as shown in the above
screenshot - we can just use curl to call the Token API and retrieve an Access Token! **Make sure to add your own values for
client_id, client_secret and code as seen in the web UI when you created your OAuth Application.
curl -F grant_type=authorization_code \
-F client_id=j5gSZ03VkevHMI11nqXey_3zYDuZCNdWRUeryOW36Ls \
-F client_secret=DonD-RMEgWyyLy-85y-cZ188neyNXEIROW5LYL_-DZO \
-F code=zKcGfdtsU-s3m5S2iBeEO-HwFx-sLcRkw5stvcYWNDQ  \
-F redirect_uri=urn:ietf:wg:oauth:2.0:oob \
-X POST http://localhost:3000/oauth/token
If all went to plan, you should get a JSON response back similar to this that contains the actual Access Token:
{
  "access_token": "AjWRB3oHTvIHYFym7IR0sABTbu55u-bAFNE8FKcvr0w",
  "token_type": "Bearer",
  "expires_in": 7200,
  "scope": "read write",
  "created_at": 1685096297
}
This token can now be used by Doorkeeper to securely associate any API calls to your Rails app with the right authenticated user.
Configuring Doorkeeper and Amazon Alexa for Account Linking
Ok! Now you’ve introduced Doorkeeper to your existing Rails app, and tested it works with a dummy app, we need to move on to setting up the OAuth Provider that Amazon will use to link Alexa accounts with your user accounts in your app.
1. Creating the OAuth Provider aka Doorkeeper Application
As we did above, lets create a new OAuth Application using the web UI Doorkeeper provides at
http://localhost:3000/oauth/applications/new
and add the config in the same way as our test. In this case though we need to make sure to use the
redirect_uris from the Alexa Developer Console account linking page. There should be three of them, and they
should look something like this https://alexa.amazon.co.jp/api/skill/link/**********.
Again, note you’ll need to be logged in as an admin - or however you defined an admin
above in the admin_authenticator block of the doorkeeper initializer to be able to access the Doorkeeper
Application management screens.
2. Connecting your Alexa Skill
The last big piece of the account linking puzzle is configuring your Alexa Skill so it knows how to connect with the OAuth provider that can link your users with Amazon’s users.
Access the Alexa Developer Console as usual here https://developer.amazon.com/alexa/console/ask and after selecting the skill you want to link, click the ‘Account Linking” menu option under “Tools”.
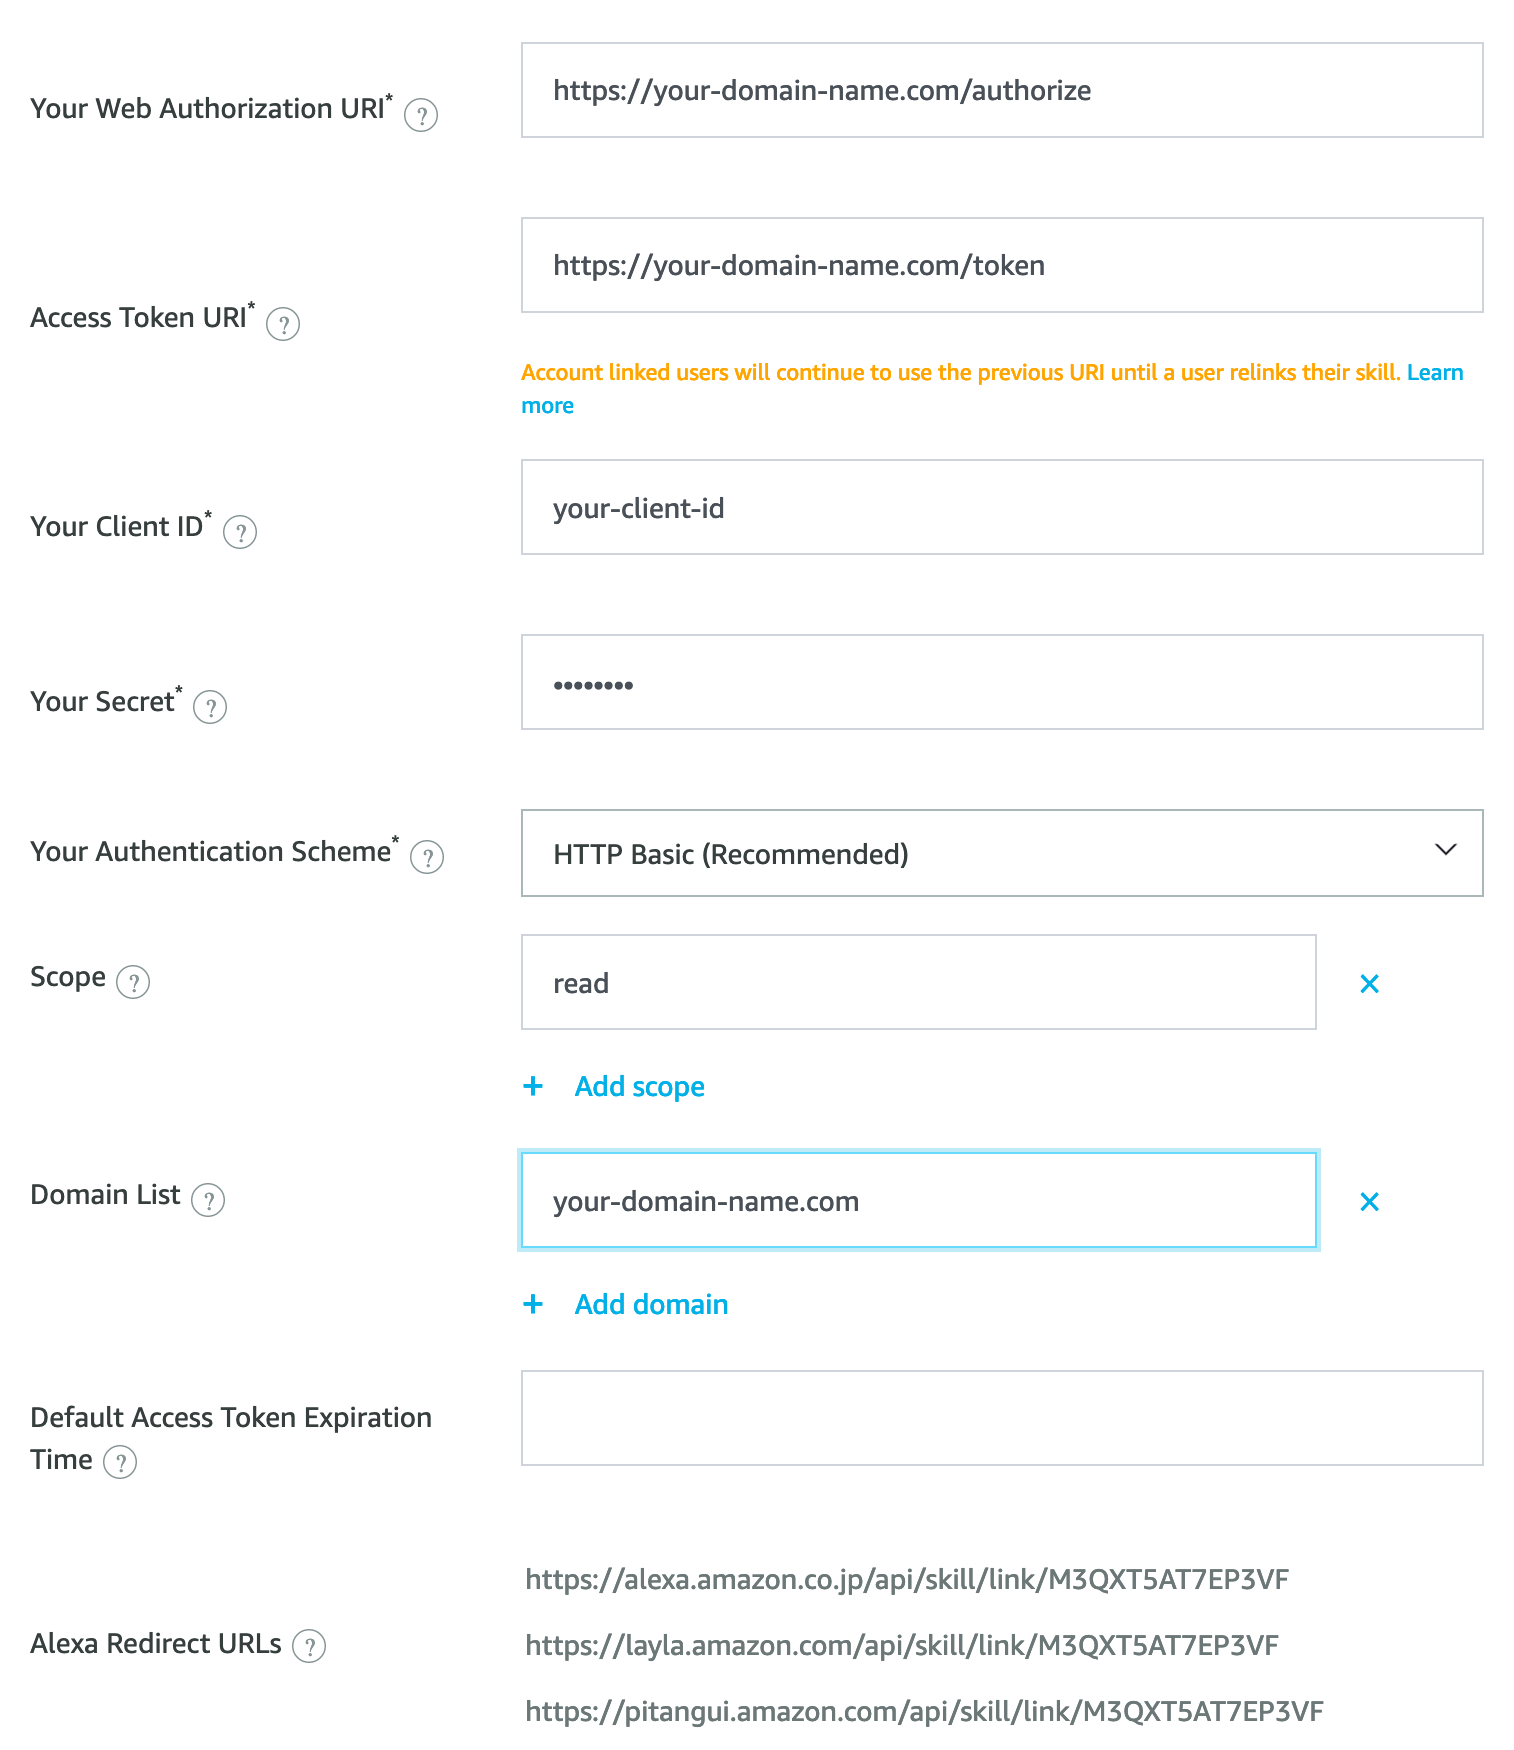
Here you firstly need to toggle the switch next to “Do you allow users to create an account or link to an existing account with you?” to enable the feature, then we’re going to need to add some information under “Security Provider Information” using the “Auth Code Grant” type.
Here’s an example screenshot of what you will be entering into the form, but I will explain each below.

Your Web Authorization URI: This points to your Rails app where you’ve added Doorkeeper. The default Doorkeeper
authorization path is, you guessed it, /oauth/authorize, so this is where you want Amazon to send people to authenticate.
Access Token URI: Similarly, this points to your Rails app where you added Doorkeeper, and is where Amazon makes
access token requests. The path is /oauth/token
Your Client ID: When you generated your Doorkeeper Application in the previous step above, Doorkeeper automatically provisioned
a client ID and Secret for you. If you declared a block for admin_authenticator in the initializer as described previously,
you can get get the Client ID from the applications web interface at http://localhost:3000/oauth/applications/1. Alternatively you can get this from your DB or directly from the model in the console with with
Doorkeeper::Application.last.uid which should return a 43 character hash.
Your Secret: This is generated by Doorkeeper in the same way as “Your Client ID” above, so you can grab this from the
applications web interface, or the Rails console with Doorkeeper::Application.last.secret and drop the resulting hash into the
Alexa configuration form.
Your Authentication Scheme: This is the auth scheme that Amazon will expect to find when they request tokens from their platform. Just leave this as the default “HTTP Basic”.
Scope: Scopes allow us to define more granularly what kind of permissions we want to provide to clients. Since we want to allow Alexa to “read” and “write” data from and to our platform, we configured these scopes in #4 above. So to match that we’ll add “read” and “write” in this section of the form in the Alexa Developer Console.
Domain List: This is an allowlist of domains that the authorization URL will fetch content from. In our case, we
just have a single Doorkeeper OAuth provider service in our Rails app, so we’ll add our domain here your-domain-here.com.
Default Access Token Expiration Time: If the OAuth provider does not set a token expiry time, then we can set a default here. Doorkeeper sets this to 2 hours by default, so we can leave this blank here.
Alexa Redirect URLs: Lastly, you should see 3 URLs listed. These are the endpoints that we need to redirect flow back
to from our app after they have authenticated. You should have added these URLs in the previous step above when creating the
Doorkeeper Application with Doorkeeper::Application.create.
Test Account Linking from your Alexa Skill
Now we can actually try to link accounts! By leveraging ngrok we can actually test linking an Alexa Skill with our
Rails app running on localhost. First, install ngrok if needed, and then start it up to serve HTTP over port 3000:
ngrok http 3000
When you do this, ngrok will spin up a session as shown below. You can use it for free but be aware the session will expire after 2 hours.
Session Status                online
Session Expires               1 hour, 59 minutes
Terms of Service              https://ngrok.com/tos
Version                       3.3.0
Region                        Europe (eu)
Latency                       39ms
Web Interface                 http://127.0.0.1:4040
Forwarding                    https://8ad4-77-101-215-47.eu.ngrok.io -> http://localhost:3000
So now we have an external HTTPS url that will forwarded traffic to our Rails app running on localhost! In my case above its
https://8ad4-77-101-215-47.eu.ngrok.io.
We can now temporarily update our Skill configuration in the Alexa Developer Console to point to this URL, so then we can link the Skill Amazon account with an account on our local machine!
Open the Alexa App on your phone and navigate to your skill setting page. You should now see a “Link Account” link in the top right. Clicking this will send you over to your localhost webapp where you can sign in and link accounts!
Once you’ve done this and deployed your app to production users with Doorkeeper configured, don’t forget to update the Authorization and Token URIs in the account linking section of the Alexa Developer Console to point to your real domain rather than ngrok on your local machine!
Accessing Authenticated Resources in your Webapp
Now we’ve successfully linked accounts, every time Amazon makes a request to our Skill Lambda, it will include the user’s
access_token in the JSON request as shown below. You can get this token via the context object via context.System.user.accessToken
"user": {
   "userId": "amzn1.ask.account.XXXXXXXXXX",
   "accessToken": "Atza|<accessToken>"
},
Now you can make requests from the Alexa Lambda back to your Rails app, passing the access token, and the Rails app can associate the token with a User in that system. For example you might want to show a list of articles that a user bookmarked in your webapp on their Alexa screen, or be able to pull up a shopping cart on Alexa to review items added in your webapp.
To enforce authentication on any resource in your Rails app you simply need a before action in your controller to protect that
resource and check the access_token was present in the request
before_action :doorkeeper_authorize!
Useful Links
- Doorkeeper Rails Guide: https://doorkeeper.gitbook.io/guides/ruby-on-rails/getting-started
- Alexa Developer Console: https://developer.amazon.com/alexa/console/ask
- Alexa Account Linking for Custom Skills: https://developer.amazon.com/en-US/docs/alexa/account-linking/account-linking-for-custom-skills.html