Track Deployments in Honeybadger with Kamal
Application Monitoring
Making sure you’re tracking errors, performance, uptime etc in your app is important even for the solo dev. In my career I’ve had experience with countless tools and platforms, but in recent years been a big fan of Sentry.io. I like the interface and it works great for Rails apps.
This time though I wanted to try out something new, and had heard about Honeybadger.io as a great (and free) option for very small projects to get started. Setting up was a breeze, and I was up and running in minutes!
Tracking Deployments
I checked the docs for Rails integrations and while there were many options, it wasn’t immediately clear how I could do this with Kamal. As I wrote about previously in Deploying with Kamal, I love it! It’s such a great experience to get something up and running on cheap hosting with no fuss. Something I hadn’t even looked at yet though was Kamal Hooks.
API Key
First things first, we’re going to need an API KEY from Honeybadger so we can communicate with their API. Go to honeybadger.io then click “Settings” and then “API Keys” on the left, and lastly click the “Create a new API Key” button! Label this key if you like - I called mine “Kamal”, then copy the key.
I’m assuming you’re using dot-env as you should be with Kamal, so open up your .env file and add the following to the end (replacing “hbp_abc123” with your key of course):
HONEYBADGER_API_KEY=hbp_abc123
Kamal Hooks
When you initialise Kamal with kamal init, it will create the .kamal/hooks/ directory that contains some sample scripts that are executed within the deployment lifecycle. You can read all about Kamal Hooks in the official documentation, but for this quick article I’m just going to talk about using the post-deploy hook to notify Honeybadger about our deployments.
Post Deploy Hook
So, inside the .kamal/hooks/ directory you should find several sample files. We’re interested in post-deploy.sample, so make a copy of that
first, without the .sample suffix. cd into your project directory and then run:
cp .kamal/hooks/post-deploy.sample .kamal/hooks/post-deploy
Open up the new post-deploy file and replace the contents with the following:
#!/bin/sh

export HONEYBADGER_API_KEY=$(grep -m 1 '^HONEYBADGER_API_KEY=' .env | cut -d '=' -f2)
curl https://api.honeybadger.io/v1/deploys -H "X-API-Key: $HONEYBADGER_API_KEY" -H "Content-Type: application/json" -H "Accept: application/json" -d "{\"deploy\": {\"environment\": \"production\", \"local_username\": \"$KAMAL_PERFORMER\", \"revision\": \"$KAMAL_VERSION\"}}"
The first line parses your local .env file to grab the Honeybadger API Key we added previously, and exports it for use in the shell session.
The second line uses curl to POST the deploy version, username and environment to Honeybadger. We use the $HONEYBADGER_API_KEY we previously snagged from the .env file to authenticate in the header, and then notice some convenience variables provided by Kamal $KAMAL_PERFORMER being the person who ran the operation and $KAMAL_VERSION to get the git revision. Neat!
Confirm in Honeybadger
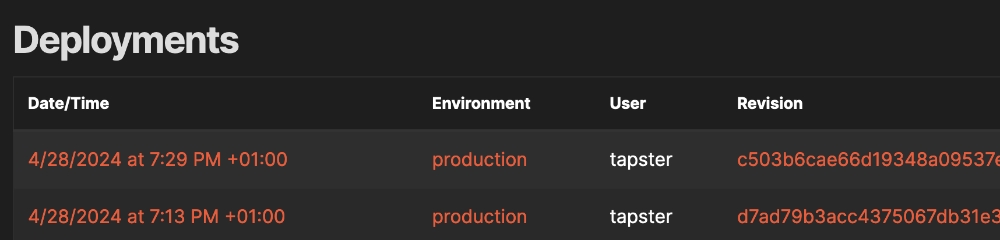
Deploy your app with kamal deploy and then head over to Honeybadger and click on the “Deployments” tab. With a bit of luck, if all went to plan you should see your deployments listed like this:
As always, don’t hesitate to drop me a note via twitter or any other channels listed here if you have questions, or corrections!